BestSellers
1. Log in to your dashboard--> layout- -> Edit HTML
2. Click on "Expand Widget Templates"
3. Scroll down to where you see this:
4. Now replace above code with below code.
<b:if cond='data:blog.pageType != "item"'>
<div expr:id='"summary" + data:post.id'/>
<script type='text/javascript'>
var blogID = "5375156378107831274";
function retriveSummaryPost<data:post.id/>(json){document.getElementById("summary<data:post.id/>").innerHTML
= json.entry.summary.$t + "..."}
function createSummaryPost<data:post.id/>(POSTID){ var script =
document.createElement("script");
script.src = "http://www.blogger.com/feeds/"+blogID+"/posts/summary/"+POSTID+"?alt=json-in-script&callback=retriveSummaryPost<data:post.id/>";
script.type = "text/javascript"; document.getElementsByTagName('head')[0].appendChild(script);
}
</script>
<script type='text/javascript'>
createSummaryPost<data:post.id/>("<data:post.id/>");
</script>
<span class='rmlink' style='float:right'><a expr:href='data:post.url'>-->d?c ti?p...</a></span>
</b:if>
<b:if cond='data:blog.pageType == "item"'>
<div id='post_body'><data:post.body/></div>
</b:if>
|
NOTE : You Must Replace 5375156378107831274 with your real blog ID.
5. Now save your template and you are done.
BestSellers
How To Add Scrolling Images to blogger
1.Login to your dashboard--> layout- ->Page Elements
2.Click on 'Add a Gadget' on the sidebar.
3.Select 'HTML/Javascript' and add the code given below and click save.
|
<marquee direction="up">
<img src="YOUR-IMAGE1-LINK"/>
<img src="YOUR-IMAGE2-LINK"/>
<img src="YOUR-IMAGE3-LINK"/>
</marquee>
|
Note : Remember to replace YOUR-IMAGE1-LINK ,YOUR-IMAGE2-LINK,YOUR-IMAGE3-LINK with your images links.
Look at the example below.
|
<marquee direction="up">
<img src="https://blogger.googleusercontent.com/img/b/R29vZ2xl/AVvXsEjPHbXCy8-_BkTfhJYsArh-SrUXP3s49KEDKe5lMT_YCR3mQPO3yevbixT8jladjxUBBtKleoAzAhsQ2KyvzMTTo0SxfR5x3_k0HpmOkq5Ivc36ozCIrqVd9NS0kbDvwRKW91GyxTySN9I/s400/KAGAYA0311.jpg" />
<img src="https://blogger.googleusercontent.com/img/b/R29vZ2xl/AVvXsEgh5qSYNL7TQ6oKueNCDNroiO3-HwChJrQWytlQKNret3u3zuIrykYPnPPDH-xFOf7u9Ir58tQSzph9IgpEXmS1JOrL-nX1Tp5Ssa6iL0s986s7aP-m4X_i2zxLH6cA5CU_i7Ufa8j8bjQ/s400/KAGAYA0433.jpg" />
<img src="https://blogger.googleusercontent.com/img/b/R29vZ2xl/AVvXsEjW-IPUkjl9UQZqS_9RnAK0d-KJNrw-Xc9LI-0_N2SzJx6FenzwmLYIsjmFPb_us5qPfDOPQ8OeOa2lMb-NGRLn3w-5UxiI5mz6lOlfFRAgcAH6DnliQt2r6tTAbZFPNMKX2teV08kt6p8/s400/KAGAYA0324.jpg" />
</marquee>
|
It look like this.
You can add more images as your choice.
BestSellers
How To Add Two Columns below your blogger post
1. Log in to your dashboard--> layout- -> Edit HTML
2. Scroll down to where you see like this code.
<div id='main-wrapper'>
<b:section class='main' id='main' showaddelement='no'>
<b:widget id='Blog1' locked='true' title='Blog type='Blog'/>
</b:widget>
</b:section></div>
|
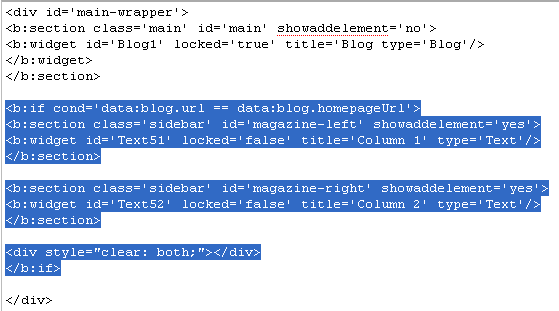
3. Now add below code between </b:section> and </div> .
<b:section class='sidebar' id='magazine-left' showaddelement='yes'>
<b:widget id='Text51' locked='false' title='Column 1' type='Text'/>
</b:section>
<b:section class='sidebar' id='magazine-right' showaddelement='yes'>
<b:widget id='Text52' locked='false' title='Column 2' type='Text'/>
</b:section>
<div style="clear: both;"></div>
|
Look at the picture below.
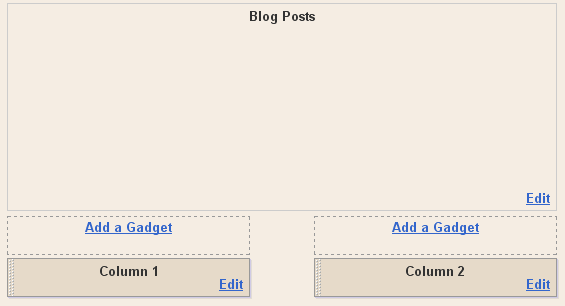
Now it will look like this.
4.Now Find below code.
5.Add below code before ]]></b:skin> tag.
#magazine-left {
width: 45%;
float: left;
}
#magazine-right {
width: 45%;
float: right;
}
|
6.Now save your template and you are done.It look like this.
BestSellers
How To Add Two Columns to blogger Sidebar
1. Log in to your dashboard--> layout- -> Edit HTML
2. Scroll down to where you see like this code.
<div id='sidebar-wrapper'>
<b:section class='sidebar' id='sidebar' preferred='yes'>
<b:widget id='Feed2' locked='false' title='Recent Posts' type='Feed'/>
<b:widget id='Label99' locked='false' title='Labels' type='Label'/>
</b:section>
</div>
|
3. Now add below code between </b:section> and </div> .
<b:section class='sidebar' id='magazine-left4' showaddelement='yes'>
<b:widget id='Text514' locked='false' title='Column 1' type='Text'/>
</b:section>
<b:section class='sidebar' id='magazine-right4' showaddelement='yes'>
<b:widget id='Text524' locked='false' title='Column 2' type='Text'/>
</b:section>
<div style="clear: both;"></div>
|
Look at the picture below.
4. Now Find below code.
5. Add below code before ]]></b:skin> tag.
#magazine-left4 {
width: 49%;
float: left;
}
#magazine-right4 {
width: 49%;
float: right;
}
|
Note : You can change values of width,as your choice.
6. Now save your template and you are done.It look like this.